

I know that Easter’s a month away. I imagine many of you may have memories of dyeing Easter eggs with the PAAS dyes your families picked up at the store. Or maybe you didn’t dye eggs at all- the only ones you know are of the plastic variety, found during a rousing Easter Egg Hunt. Or, you skipped the plastic eggs completely and went all in on Cadbury Cremes- no judgement.
In many cultures, eggs are synonymous with the arrival of spring, as they represent fertility. Greeks have their red eggs, baked into Easter breads (symbolizing the blood of Christ and rebirth). In Germany, eggs that are baked into Easter foods are blown out- not cracked- and the shells are decorated with paint and ribbons. And then you’ve got Ukrainians, with their pysanky.

History:
Intricate, colorful designs worthy of an entire museum exhibition contain a wealth of symbolism in each egg. The practice dates back to ancient Slavic communities, where eggs were considered a sign of life and contained mystical powers. According to historians, Ancient Slavs believed that birds were the closest connection they had to their main god (aka Dazhboh, or the Sun God). I don’t know about you, but unless you’ve personally worked with birds before, it is damn near impossible to try to catch one. Thus, the ancient Slavs decided that birds’ eggs contained magical powers. And they were treated as such.
The modern iteration of pysanky may not look exactly the same as it did in those ancient communities, but most of the symbols carried on through the years. However, their meanings evolved as Christianity became a more widespread practice across Eastern Europe. For example: the cross, which most people now interpret as a representation of Christian faith, once symbolized the rising of the sun. When I create pysanky, I use the symbols as a tool to guide me to a final design, especially if they’re a gift for someone I know. It makes the end result more meaningful.
The Process:
The word “pysanky”/”pysanka” is a play on the Ukrainian word “pysaty,” which means “to write.” There is a sort of writing involved to get the design onto the egg, but it’s not with a writing utensil.

This wooden tool is called a kistka (pictured: a well-used kistka next to a brand new one). It’s a small wooden dowel with a copper cone wedged through the top, secured by copper wire. Next to the kistka is a lump of beeswax. To use the kistka, you start by scooping up a healthy amount of beeswax into the larger end of the cone and heating it over a candle. The wax melts, and you use the thinner end of the kistka to “write” your design onto your egg.
Sounds easy, right? Fortunately, it is pretty simple to get from plain white egg to beautiful pysanka. However- you’re going to need to carve out some time and patience in your day to bring one of these beautiful eggs to life.

First off, I needed to prepare my dyes. These last for several years if properly cared for. For now, I made the four basic colors found in most pysanky: yellow, orange, red, and black (pictured above). And yes- the order is important. More on that in a moment.
To make the dyes, I added boiling water and white vinegar to a jar with powdered dye. While it cooled, I planned my design.

These are just a handful of example designs that came with my pysanka kit (which you can order here, if you’d like). I like to start with something simple, as a warmup. I decided on recreating my own iteration of the bottom center egg in the picture above. There’s a decent amount of linework that I thought would look great in a variety of colors, and I could have a bit of creative freedom with the flowers. The linework on this design, which includes the division of the egg into 8 sections + a line through the middle, is a common way to separate sections of a pysanka. It also features a diamond pattern overtop those other sections, which is a style called “forty triangles.” Some modern interpretations claim the significance of forty triangles symbolizes the 40 days of Lent, but as for ancient meaning, historians aren’t sure. I always found creating any sort of “forty triangles” or “forty wedges” design was a sign of accomplishment. An old wives’ tale I heard was that creating the “forty wedges/triangles” perfectly meant that you’d be protected by the gods until the next spring. And we can’t forget the flowers- those symbolize fertility and the rebirth of nature.

With the candle lit, the dyes cooled, and the design chosen, I’m ready to make a pysanka. I heat up the kistka at both ends to get the wax melted, but beyond the beginning, I just heat up the thinner end to prevent what I call “blobbing.” There’s only so much I can do to control the flow of wax onto my egg, but if I get the kistka too hot, the wax will spill out in massive blobs (that has definitely ruined several past designs). It’s a delicate process. I’ve learned not to rush it.

Please excuse the quality of this photo, it’s hard to document the process with one hand.
So, despite the lack of it on the egg so far, let’s talk colors. In the design planning process, it’s crucial to know what colors you want your design elements to be. When dyeing the egg, you start with the lightest colors first, then work your way through darker colors until you reach your final color. As I mentioned earlier, I’ve interpreted this design to feature all the basic colors found in many pysanky: yellow, orange, red, and black. And yes, before you ask- the colors are symbolic as well. However, it’s worth noting that color symbolism varies from region to region, generation to generation, pysanka to pysanka. Here’s my interpretation: white stands for purity and birth, yellow is wisdom and the eternal sun, orange symbolizes flames, endurance, and passion; red stands for action, spiritual awakening, and joy of life and love, and black represents eternity and the other world/afterlife.

Here’s how my first set of lines turned out. Everything covered in beeswax will remain white until I remove all the wax at the end. Off to the dye.

I kept it in the yellow for 20 minutes, but it probably would’ve been fine if it stayed in for 10. Either way, the color came out beautiful. The next step was adding wax to the parts I wanted to keep yellow. It wasn’t a ton, so here’s the egg before I put it into the orange dye.

You’ll see the beginnings of the “forty wedges” start to form here. I added another set of diagonal lines after the egg spent some time in the orange dye:

Now, here’s where things got funky. Remember how I said that you need to plan what colors every element needs to be before beginning our pysanka? Well, I forgot about the center line completely until this egg came out of the red dye. My only choice to keep the original design intact was to make the center line red, but I had planned on making the flowers red. I wasn’t sure how it would all come out. In the spirit of highlighting how this process can involve mistakes at any point, I went ahead and waxed both the center line and the flowers.

If you can see the other colors poking through the wax lines at this point, that’s ok. They’ll stay intact even after I put this egg in the black dye, which is my final color.

Here’s the final dye result, before I begin the de-waxing process. You can see the colors fairly well, but wait until you see what’s under all that beeswax.

In order to dewax, I’m holding the pysanka close to the flame. Not directly on it, though- you risk scorching or breaking the egg. And why let all your hard work go to waste at this point? The sad thing is, the end is the most common place in the process for a pysanka to break. But I say: that’s okay, you can always make another one.
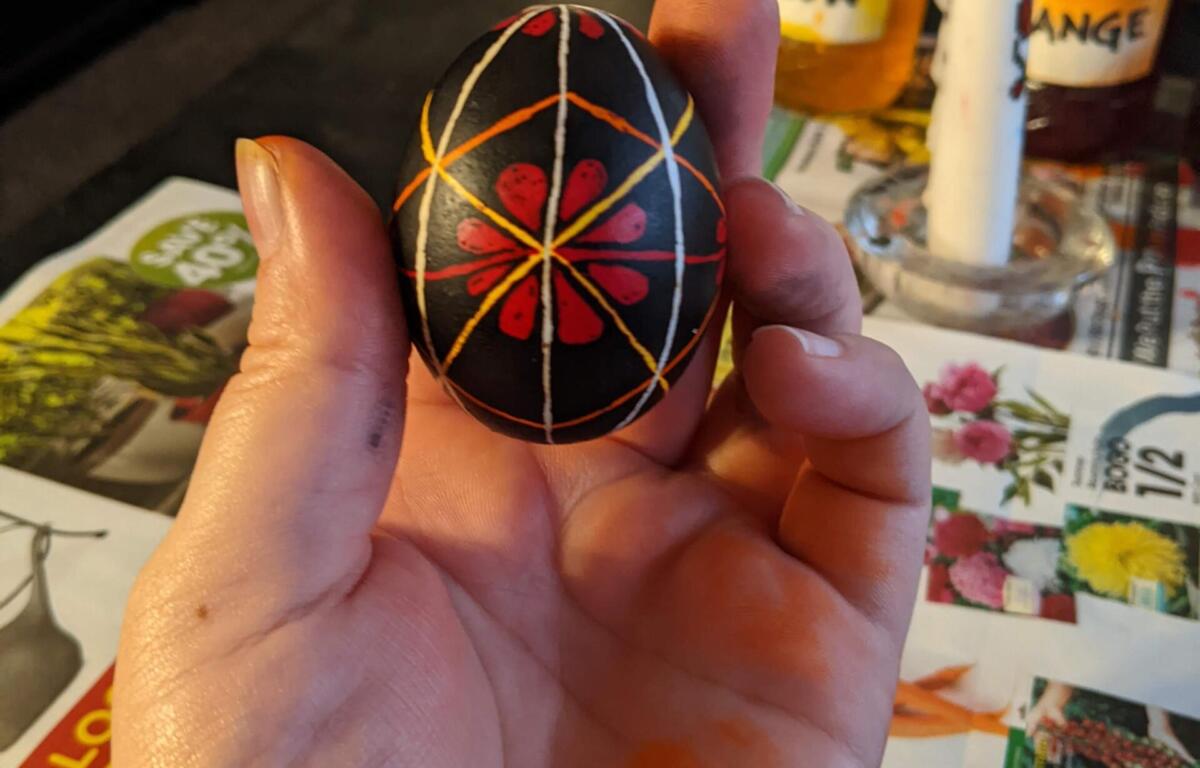
After dewaxing, many people will blow out the egg yolk and cover the pysanka shell in varnish for display. I do not have the tools to do that, so my pysanka is complete after the dewaxing process.

Despite a mid-process design change, I’m satisfied with how this turned out. I’d like to explore additional colors and more intricate designs in the weeks leading up to Orthodox Easter (April 24th). And hopefully, with this skill that I’ve developed over the past few decades, I can use it to create positive change in this world.
That said- in the near future, I will be streaming the pysanka-making process live as a fundraiser to help people impacted by the war in Ukraine. My friends are still fighting for their right to live and speak their language in the country they grew up in. I’ll have more details on that fundraiser at a later date.
Huge thanks to Luba Petrusha, whose website is a vast expanse of pysanka knowledge if you’d like to learn more.